अपना विंडोज का पासवर्ड चेंज होने से कैसे बचाये
If you want to make your windows password safe I mean anyone is not able to change your password or when it is modified you can back your password easily. Here I am going to explain the step by step process of password reset/recovery...
Step 1:- Open any drive & create a notepad file.
Step 2:- Right Click on that Notepad file and click on Edit. Notepad file will open again.
Step 3:- Go to Run and type lusrmgr.msc to open Local Users & Groups.
Double click on Users node to get all users list of your machine.
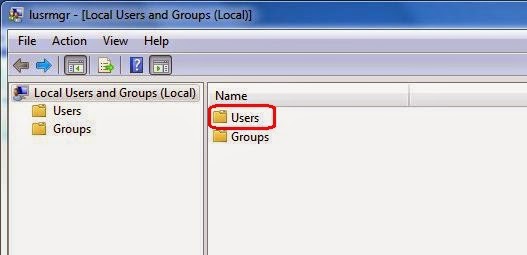
Suppose you want to reset administrator account.
Step 4:- Then go back to notepad file which is open in step 2.
And type the Net User command,
The above command will change the administrator password to 123@qwe.
Step 5:- Now go to File Menu > Save As & save that file with anyname.bat extension.
Remember the location of your Batch file in my example it is F:\reset.bat
Step 6:- Now go to Run & type gpedit.msc to open Group Policy Editor window.
Step 7:- Go to Computer Configuration > Windows Settings > Scripts.
Double Click on Scripts to open scripts node.
Double Click on Startup, It will open a new window, and click on Add Button to add the Batch file you created in earlier steps.
on clicking on Add button a Browse window will open,
Select the Batch file to add in startup scripts,
Step 7:- Go to Run and type gpupdate /force command to update the group policy.
After following the above steps when anyone is going to change your account password, he will be able to change but after restarting the machine that script will run and net user command will reset your password to 123@qwe.
Enjoy....& Visit again for more Tech Tips & Tricks...
Thanks for your valuable visit
Search This Blog
Tuesday, 6 January 2015
Sunday, 4 January 2015
Manage User Accounts through Command Prompt...by sandip kushwaha
Open cmd prompt with admin priviledge... & run following commands.
COMMAND ACTION
net user lists all user accounts.
net user username details about specific user.
net user username password /add create new user a/c.
net user username newpassword change user password.
net user username * /add create user a/c with hidden password.
net user username /active:yes enable user a/c.
net user username /active:no disable user a/c.
net localgroup lists all groups.
net localgroup groupname details of a specific group.
net localgroup groupname /add create a new group.
net localgroup groupname username /add move user to a group.
net localgroup groupname username /del remove user from a group.
if u r facing any problem plz contact at
COMMAND ACTION
net user lists all user accounts.
net user username details about specific user.
net user username password /add create new user a/c.
net user username newpassword change user password.
net user username * /add create user a/c with hidden password.
net user username /active:yes enable user a/c.
net user username /active:no disable user a/c.
net localgroup lists all groups.
net localgroup groupname details of a specific group.
net localgroup groupname /add create a new group.
net localgroup groupname username /add move user to a group.
net localgroup groupname username /del remove user from a group.
if u r facing any problem plz contact at
How to Break Windows7 Password without Third Party Softwares...
Action:- Breaking Windows 7 password without third party software.
Requirements:- Bootable Windows7 pendrive or DVD.
Step1:- Insert bootable usb drive in machine & restart ur machine and press boot key for boot menu.
in my case it was F12 for gigabyte mobo.
then select your USB drive in my case it was hp pendrive.
it start booting with pendrive like this..
on above screen select next. then on next screen click on repair your computer.
it will open system recovery option, select windows7 and click next.
After clicking on next it will display all the options of system recovery.
select command prompt then cmd prompt will open like this
run the following command in command prompt..
check for OS drive by c:, d:, or e: cmd in my case it is C:\Windows\
go to C:\WINDOWS\SYSTEM32 location and type ren command to rename cmd.exe to magnify.exe.
after running the above command type exit and restart machine without pendrive (Normal OS Mode)
when it will ask for password at login screen click on Ease of Access Button at left lower corner of window.
After selecting this icon an window will open then select Magnifier and click on Apply.
After clicking on apply it will open cmd prompt. like this...
run net user command to get user details and to change user password.
If you are unable to do net user command plz see my other blog of net user commands.
Thank You.
Requirements:- Bootable Windows7 pendrive or DVD.
Step1:- Insert bootable usb drive in machine & restart ur machine and press boot key for boot menu.
in my case it was F12 for gigabyte mobo.
then select your USB drive in my case it was hp pendrive.
it start booting with pendrive like this..
on above screen select next. then on next screen click on repair your computer.
it will open system recovery option, select windows7 and click next.
After clicking on next it will display all the options of system recovery.
select command prompt then cmd prompt will open like this
check for OS drive by c:, d:, or e: cmd in my case it is C:\Windows\
go to C:\WINDOWS\SYSTEM32 location and type ren command to rename cmd.exe to magnify.exe.
after running the above command type exit and restart machine without pendrive (Normal OS Mode)
when it will ask for password at login screen click on Ease of Access Button at left lower corner of window.
After selecting this icon an window will open then select Magnifier and click on Apply.
After clicking on apply it will open cmd prompt. like this...
run net user command to get user details and to change user password.
If you are unable to do net user command plz see my other blog of net user commands.
Thank You.
Connect internet in PC/Laptop via android mobile with USB
Connect internet in PC Laptop by android mobile with USB. Today many android phone have a facility to share its data packet with personal computer (PC) or laptop by just enabling only one check box of your cell. Usually i need to connect internet in my laptop with this method when i cant access my broadband service. I have made this practical i.e Connect internet in PC Laptop by android mobile with USB. No need for any PC suite for connecting to access internet and not even require an user-id and password. This is all possible by “tethering” feature means actually we can share the Internet connection of mobile phone with other devices using cable. You can even access internet on PC by mobiles using Wi-Fi Tethering and Bluetooth tethering feature. Even you can share your Internet data of mobile with another Mobile. Here are steps to connect internet in PC laptop by android mobile with USB:
Step 1.) First step is to Connect your mobile with PC or Laptop via USB cable.
Step 2.) Check whether your data packet is Enable or not and ensure that your internet is properly working in mobile and you are able to open web pages in your android mobile any browser.
Step 3.) After performing above steps, go to mobile setting and select wireless and networks and go to “Tethering and portable hotspot”. i.e Setting -> Wireless and networks ->Tethering and portable hotspot. Now select “USB Tethering” and make it enable as shown below.
Step 4.)Check for the “internet Network” to appear in your PC in bottom most right position as shown below, and click that icon to check the notification that if you can make internet access.
If any problem persist to Connect internet in PC Laptop by android mobile with USB, you can call @ 9670642896 & 9125414690
How To Create Ad-hoc Wireless Network in Win 8/8.1.....
Hi guys I m going to explain u how to create Adhoc network in windows 8/8.1
Step 1:- Open the Command Prompt with Administrator priviledge.
Step 2:- Type the following cmd to ensure that ur network interface supports Hosted Network feature
netsh wlan show drivers
Step 3:- Run this cmd to configure wifi adhoc connection
netsh wlan set hostednetwork mode=allow ssid=<ur name> key=<password>
Step 4:- Run the following command to start it.
netsh wlan start hostednetwork
Now ur new network is ready to use..........connect & enjoy.
Subscribe to:
Posts (Atom)


.png)
